Events
There are two ways to add a new event to the Scheduler grid:
- Click — To create an event of the default duration, double-click on the spot on the grid that you would like the event to appear.
- Drag — To create an event of a particular duration, drag
out an area on the grid by clicking on the start time and holding the
mouse button down while you drag to the end time. This
should highlight the desired area on the schedule. Now
press the Enter key.
Either will then open the New Event screen:

Note:
You cannot add events if the Scheduler Main Screen display
is set to View by Person. Click to change the display to one of
the other views (View by Date, View by Equipment
or View by Location).
Adding a New Event
- Description
Enter a brief description of the event in the box. The information that you type here will appear on the grid and reports about this event. - Start Date
This will default to the date you clicked on in the grid, but you can change it if needed. You can type in the date (Use a MMDDYYYY date format WITHOUT slashes.) or click the calendar dropdown button to bring
up a calendar. Click the desired start date on the calendar. You can
move through the months on the calendar by using the arrow buttons at
the top of the calendar.
calendar dropdown button to bring
up a calendar. Click the desired start date on the calendar. You can
move through the months on the calendar by using the arrow buttons at
the top of the calendar. - Start Time
Will represent the time you had selected on the grid, but you may change it if needed. You can use the arrow buttons to advance the hours or type in the time.
 - All
day event
If the event will last the entire day, click to put a checkmark in the box. These events will appear on the grid in the gray space at the top. - Reminder Alarm
When you check this box it will provide you with a pop up reminder. You can set the amount of time before the event that the reminder will be displayed.Note:
Reminder alarms can only display at the desired time if the Scheduler Module is running when the reminder time occurs. - End Date and End Time
Enter if needed. The End Date will default to the same date as the Start Date. If you opened the event by double-clicking on the hour the event is to begin, the End Time will default to the end time frame set on the Scheduler Options screen.
New Event Screen Tabs
If desired, use this tab to schedule Locations for this event:
- Click the Change Event's Locations button to open the Select Location dialogue box.
- Click the box(es) beside the desired location(s) to add them to the event to put a checkmark in the box.
- You can limit the Equipment
listed to those in a particular category by clicking on the
 dropdown button
in Select Equipment in Category to choose one of your Categories.Use the Check All or Uncheck All buttons, if needed.
dropdown button
in Select Equipment in Category to choose one of your Categories.Use the Check All or Uncheck All buttons, if needed. - You can select locations from one of your Categories.
- Use the Check All or Uncheck All buttons, if needed.
- To add a new location, click the Setup Locations button. After the location has been added on the Locations screen, it will appear in the dropdown list of locations.
If desired, use this tab to add People for the event:
- Click the Change Event’s Contacts button to open the Select People dialog box.
- Click the desired name(s) to highlight and then click the right arrow to add the name to the Selected People box.
- To remove a name from the Selected People box, highlight the name and click the left arrow.
- Click OK to close the Select People dialog box and add the name(s) to the Contacts tab.
If desired, click the tab
to schedule Equipment for the event:
- Click the Change Event’s Equipment button to open the Select Equipment dialog box.
- Click the box(es) beside the desired equipment to add the equipment to the event to put a checkmark in the box.
- You can limit the Equipment
listed to those in a particular category by clicking on the dropdown button
in Select Equipment in Category to choose one of your Categories.
- Use the Check All or Uncheck All buttons, if needed.
- Click OK to close the Select Equipment dialog box and add the equipment to the Equipment tab.
If desired, click this tab to assign Categories for
the event:
- Click the Change Event’s Categories button to open the Select Category(ies) dialog box.
- Check the desired category(ies).
- Click OK to close and add the Category(ies).
If you need to add a new category not already listed in the Scheduler, click the Setup Categories button. The Categoriesscreen will open and you can add the new category. When you return to the Categories tab of the Event Screen, click the Change Event’s Categories button to add the category to this event.
Click this tab to add any other
information or comments about this event, as needed.
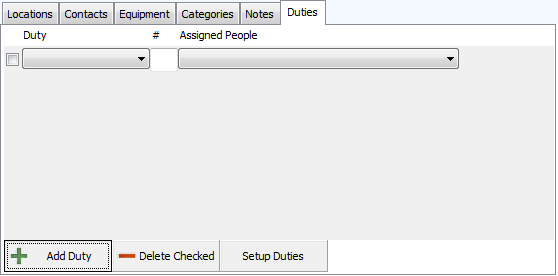
This tab will allow you to list Duties
that will be needed for this event. It also allows you to assign People
to those duties:
- Click the + Add Duty button to select duties for this event.
- Select the Duty to be added from the dropdown.
- In the # box beside the duty, type in the number of people who should be assigned that task. The default will be one. This enables the program to produce reports that list events with duties that have not been assigned.
- Next, click the Assigned People dropdown
to open the Select People dialog box.
- Click the desired name(s) to highlight and then click the right arrow to add the name to the Selected People box.
- To remove a name from the Selected People box, highlight the name and click the left arrow.
- Click OK to close the Select People dialog box and add the name(s) to the Assigned People on the Duties tab.
- If you need to add a Duty that has not already
been added to Scheduler, click the Setup Duties button.
- The Duties screen will open and you can add the new duty.
- When you return to the Duties tab of the Event screen, click Add Duty.
- The new duty will appear in the dropdown list under Duty.
- To delete a duty from the event, click to put a checkmark in the box to the left of the duty to be deleted. Click on the — Delete Checked button.
If this event will be repeated, click Recurrence at the top of the screen. The Recurring Events screen will open.
Click Save & Close to enter the event on the grid.
Note:
If there is a location, equipment or person conflict with an existing
event at the scheduled time, a Conflict warning message will appear describing
the conflict and asking if you want to Save anyway. If this is a recurring
event, click the View / Print Conflicts button to see a Conflict Report. If you choose to save the Conflicting Events,
the event will appear on the grid with a colored bar at the top until
the conflict is resolved. If you choose to resolve the conflict right
away, you will be returned to the New Event screen.
