Editing or Deleting an Event
To make modifications after Adding a New Event, use the Scheduler Main Screen to adjust the event you need to edit.
- Double-click the event to open the Event screen. (Or, you can right-click the event and choose Edit.)
- If the event is set
up as a recurring event, a screen will open asking you to select either
Open entire series or Open this event only:
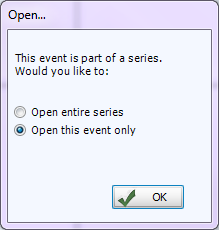
(If you choose to open this event only, you will not be able to Edit Recurring Events.) - On the Event screen, all of the fields can be edited (this screen is the same as the one used for Adding a New Event).
- Make any desired modifications and click Save & Close.
- Click Cancel to close the Event screen without saving any of the changes.
Moving an Event
If you need to change a scheduled event to a different date or time, there are a couple of ways to move an event, first, go to the original date and time of the event on the Scheduler Main Screen then either:
- On the grid, simply drag and drop the event to the new time.
- Double-click the event to open the Event screen.
- Make the date and/or time change(s).
- Click Save & Close.
- The grid will be refreshed to reflect the new date or time.
OR
Deleting an Event
After Adding a New Event, if you find that Editing or Deleting an Event is not sufficient, there are three ways to delete an event, either:
- Open the event from the Scheduler Main Screen and click the Delete button on the Event screen.
- Right-click the event in the grid and select
Delete from the menu.
- Select an event on the grid and press the Delete key on the keyboard.
If the event is a Recurring Events, you will be asked to Delete this event only or Delete the series.
