Attendance Report
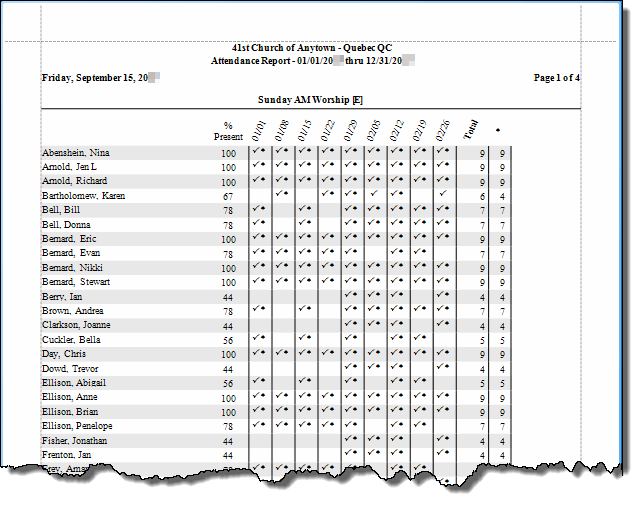
Using the Attendance Report you may print an attendance history chart that lists each member's attendance history during a specific date range. This report prints a grid, listing each attendance date recorded at the top, and a blank space for Absent or a ✔ checkmark for Present for each person for each date. It will also give an attendance total and percentage for each person.
To view or print the Attendance Report:
- From The Initial Portal of Church Windows choose Membership
- Click Reports/Export in the Button Bar at the top of the screen.
- Click Attendance
- Choose Attendance Report
- It will open to the Options tab:

This is where you make your main selections for the Attendance Report. If you are choosing to print an attendance report for Groups / Classes, then only people who are members of these groups will be on the reports. If you choose to print a attendance report for an Event, then everyone in your database may be included on the report.
- Report Date Range
- The date range will default to the entire current year.
- If you want to change to a different date range or a single date, you can either:
- Use the -YR and +YR buttons to move the year forward or backward
- Use the dropdown calendar
- Type a date in the boxes (MMDDYYY no slashes)
- Include Groups/Classes Members...
- Additional Options
- Include those who did not attend
- Indicate Communion
- Include Family
- Groups / Classes Additional Info
-
Show Details
When
 checked, the report prints letters under the checkmark to show that the person met specific
Additional Information criteria for the day — for example, that this person learned their Bible verses for the day.
checked, the report prints letters under the checkmark to show that the person met specific
Additional Information criteria for the day — for example, that this person learned their Bible verses for the day. -
Show Individual Totals
When
checked, the report shows totals on the right side of the report for each person indicating the total number of times that person met the
Additional Information criteria.
-
Show Date Totals
When
checked, the report prints totals at the bottom of the report showing for each date the total number of people meeting each additional information criteria. It also provides a total for all the dates and indicates a percentage of times the criteria was met.
-
- Select Event(s), Group(s), and/or Class(es) to Include
- If you are going to report on an Event, place a checkmark in the Events box. Or, if you would like to report on a Group / Class, place a checkmark in the Groups / Classes box.
- If you are reporting on a Group / Class, select the Division, Department, Category in which that class is listed. Selecting a Division, Department, Category narrows the list you see. If you have not set up specific Divisions, Departments or Categories, leave those fields blank and you will see a list of all the Events / Groups / Classes in the list box to the right.
- To select
Events or
Groups / Classes to be included on your report, click to place a checkmark next to the name of that Event or Group / Class.
- To select all available Events or Groups/Classes put a checkmark in the column header box to the left of the "Code" column:
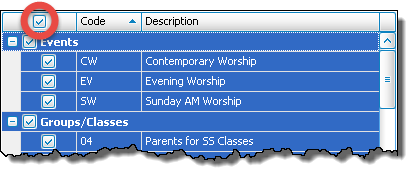
- You may include up to twenty Events or Groups/Classes on this report at a time. (If you select several Events / Groups / Classes, you may need to reduce the font size and print the report in landscape format. If you select several Events or Groups / Classes, a message will appear if the data is going to be cut off at the right edge of the paper.)
Note:
The items in any list can be sorted either by the code or the description; the default is code for most fields. When viewing the list of codes and their descriptions, click on the header of the column by which you would like to sort the list (either the code or description) and a small, upward arrow will appear. This will automatically order your list by that column in ascending order. However, click once more and you will see that the column has reordered the list in descending order, with the arrow pointing downwards
  .
The items will revert to being sorted by code when you navigate elsewhere in Church Windows.
.
The items will revert to being sorted by code when you navigate elsewhere in Church Windows. - Choose any of the following tabs to apply additional settings:
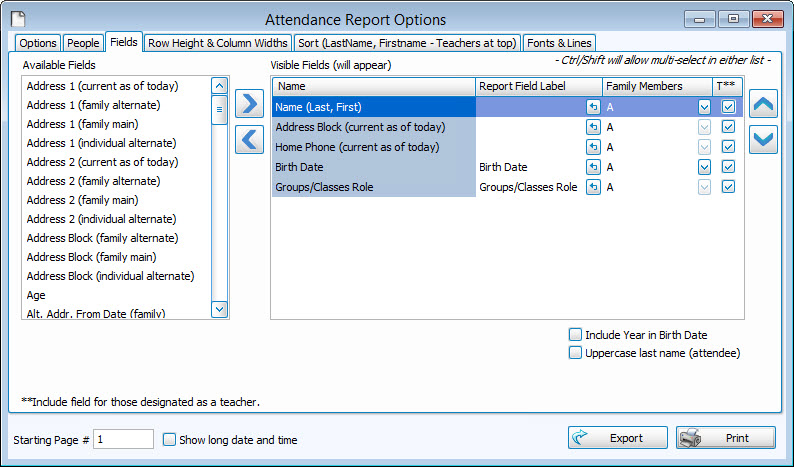
- The options here allow you to select which field(s) you want included one the worksheet. Using the
 left and
  right arrow buttons in the middle to bring them back and forth between the Available and Visible columns.
 - You can also choose what label, if any, you want to show on the report itself for each field.
- There are also choices to show other family members and to include a field for designated teachers, if that is set up correctly in Membership.
- Use this tab to sort the report contents by up to three columns (sort fields).
- Click to change the order of each sort field to either Ascending or Descending order.
- To see a list of the sort options available, click on the
 dropdown button in the Sort Field 1 box.
 - To select a sort option, click it in that list.
- If you do not select an option, the report will default to the most recently used sort order.
- Click Reset Sort to return the selections to their original state.
- Once you have made all of your selections, click Print to view a Print Preview and then proceed in sending the file to your printer. You can also Export most reports and/or Send via Email as a file to be used outside of Church Windows.
If you use the Role field in Set Up Groups and Classes, you may limit your report to
those people who have a certain role within a group. To do so, select that Role from the With the Role: dropdown list.
Leave unchecked to exclude those who have not attended or check it to include them.
Will add a ✦ diamond indicator next to the ✔ checkmark for those recorded as having communed as well as attended.
Family Categories Codes
Will include a letter in brackets after the names of people on the report to indicate their assigned Family Categories (e.g. [V] for Visitor, [M] for Member, etc.)
The second tab is the standard "People" screen that is in most reports in the program.
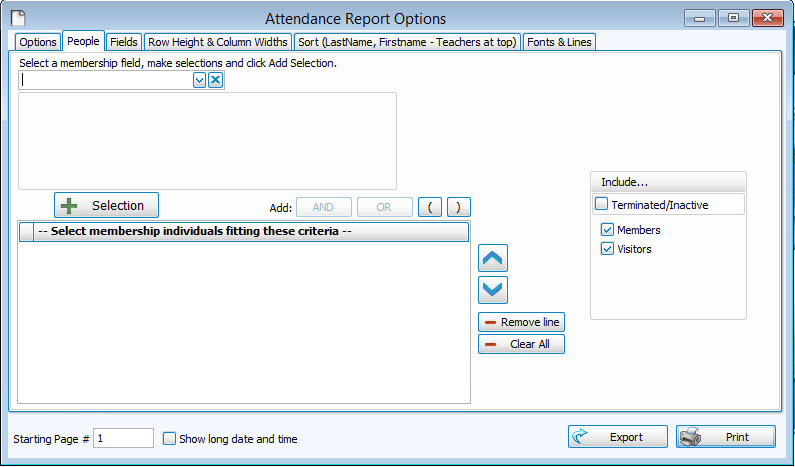
Just use the dropdown to select the field(s) and click the  button below to add. Further customize by adding additional criteria to limit your results. On the right, you can also select Inactive, Members, Visitors, or a combination.
These tabs deal with actual technical layout information such as row heights, column widths, and fonts and line separators. Make adjustments and use the
Print Preview to view the changes.