Managing Groups / Classes from Individual Record
Once you are done Add Groups / Classes you will want to assign people to them. You can assign people to Groups / Classes from their individual record to assign one person to multiple groups /classes, or by Managing Group Members using Assign Groups & Skills to assign multiple people to one Group or Class.
- From The Initial Portal of Church Windows choose Membership
- Open The People File
- If the appropriate family/individual record is not open, bring it to the screen using Person Lookup, the Prior
and Next buttons,
or Using the Find Function.
- Groups / Classes tab
Click this tab to view the individual's group enrollment information: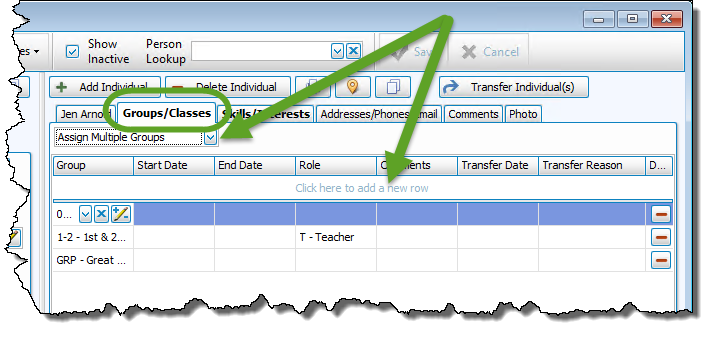
- Assign Multiple Groups
Clicking this dropdown will allow you to select and assign multiple groups to one person quickly and easily, simply click the down arrow and checkmark the desired groups: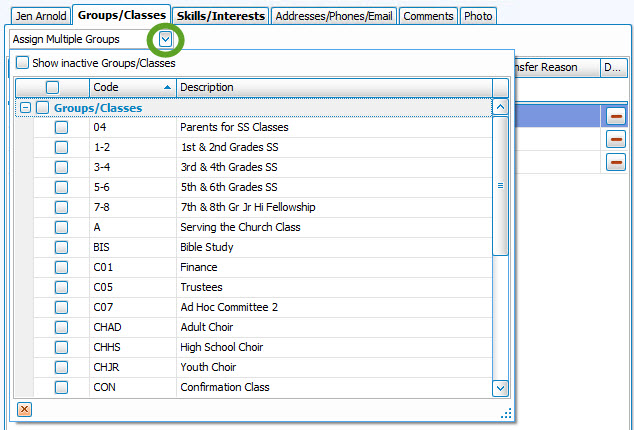
- "Click here to add a new row"
To assign just one Group / Class to this person, click in this box to reveal the dropdown button for the available Groups / Classes.
- Group Column
Click the dropdown button to see a list of all the Groups / Classes set up in your system. Select the Group / Class you wish to assign to this individual's record. - Press TAB on your keyboard or click to continue through the other columns (see below) adding any information you have until the row moves down to the lower portion of the screen.
 Additional Information
If you wish to enter more details about a person's group Membership, use any or all of the following fields.
- Start / End Dates:
- You will be asked if you would like to enter a date range that would indicate the valid dates of Membership for these people in this group.
- If you enter a date range here, it will be entered on all of the records of the individuals you just added to this group in this session. (Use a MMDDYYYY date format WITHOUT slashes.)
- You are not required to enter dates here. Leave these fields blank if you do not wish to track this information.
- Entering an ending date for a person will terminate their enrollment in this group.
- Entering dates for people elected to a Church office or for Sunday School classes would both be a good use for this function.
- Role:
- Role is the person's level of enrollment in the group.
- Possible roles might be that of T — Teacher, C — Chair, or P — Participant.
- Click the Role box and click the down-arrow that appears.
- This is a List field; you create the codes (up to five characters or numbers) and descriptions to describe the role a person can have in a group.
- From the available roles, select the one that best describes each person's role in that Group or Class.
- Comments:
- You may also enter any Comments you wish.
- This is a character field and will accept up to 32 characters.
- You may track whatever information you choose.
- Transfer Date:
- Transfer Date records the date that person was moved into another Group or Class. (Use a MMDDYYYY date format WITHOUT slashes.)
- This is particularly useful for
Sunday School classes.
Note:
The Transfer Date is NOT the date the class was ADVANCED a level when you Advance Groups / Classes.
- Transfer Reason:
- Transfer Reason records the reason a member was transferred into another group.
- This is a
List field and you create the codes (up to 5 characters or numbers or a combination of the two) for the list of reasons for transferring people into other Groups or Classes.
For example, you might have as a reason for transfer: New Class Created. This would mean that your Sunday School classes have grown so large that you created a new class and moved some of the children into the new class.
- Start / End Dates:
- Continue to add any other Groups / Classes in the same way and simply navigate away when you have finished. You can click the save button, however it will automatically save as well.
- If you need to remove someone from a Group / Class, simply give them an end date or click the
 Delete button at the end of the line for the group to completely remove them.
Note:
The items in any list can be sorted either by the code or the description; the default is code for most fields. When viewing the list of codes and their descriptions,
click on the header of the column by which you would like to sort the list (either the code or description) and a small, upward arrow ![]() will appear. This will automatically order your list by that column in ascending order. However, click once more and you will see that the column has reordered the list in descending order, with the arrow pointing downwards
will appear. This will automatically order your list by that column in ascending order. However, click once more and you will see that the column has reordered the list in descending order, with the arrow pointing downwards ![]() .
The items will revert to being sorted by code when you navigate elsewhere in Church Windows.
.
The items will revert to being sorted by code when you navigate elsewhere in Church Windows.
