Managing Group Members using Assign Groups & Skills
In order to do Attendance Entry for a Group or Class, you must first enroll people in them. There are two different ways to do this. To assign multiple people to one Group or Class we will use the Group / Skill Assignment screen. (Whereas, to assign one person to several Groups / Classes we recommend Managing Groups / Classes from Individual Record.)
- From The Initial Portal of Church Windows choose Membership
- Click Groups / Skills
- Click Assign Groups
- The Assign Groups / Classes & Skills / Interests dialog box opens and you will automatically be on the Groups / Classes tab:
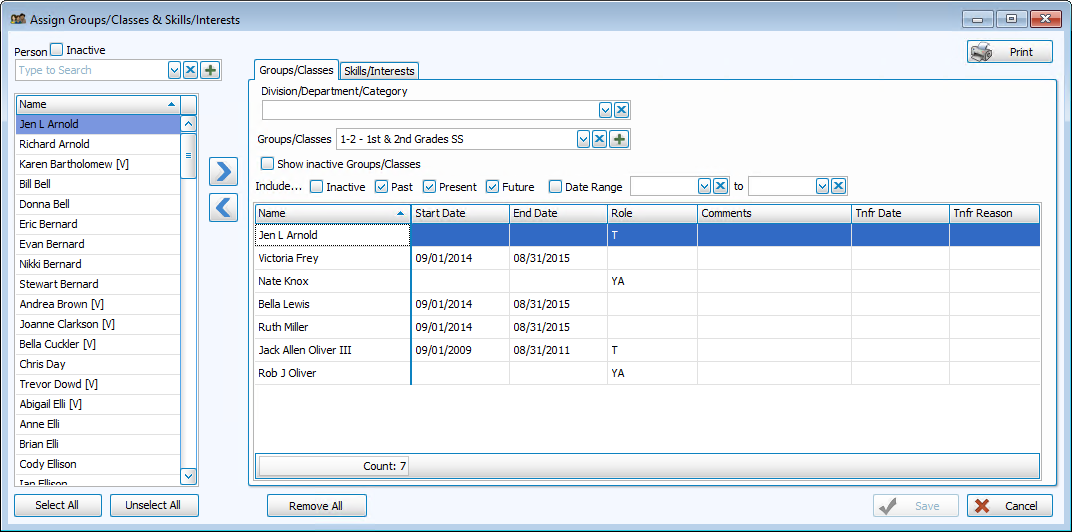
Division / Department / Category
In this  dropdown, you can select the one that the class is listed under.
Groups / Classes
In this dropdown, choose the class to which the people are being assigned.
Note:
The items in any list can be sorted either by the code or the description; the default is code for most fields. When viewing the list of codes and their descriptions,
click on the header of the column by which you would like to sort the list (either the code or description) and a small, upward arrow ![]() will appear. This will automatically order your list by that column in ascending order. However, click once more and you will see that the column has reordered the list in descending order, with the arrow pointing downwards
will appear. This will automatically order your list by that column in ascending order. However, click once more and you will see that the column has reordered the list in descending order, with the arrow pointing downwards ![]() .
The items will revert to being sorted by code when you navigate elsewhere in Church Windows.
.
The items will revert to being sorted by code when you navigate elsewhere in Church Windows.
To Add Groups / Classes, if needed:
Person
On the left side of the screen, there will be a list of all individuals in your database. At the right of the screen, there will be a blank list of group members for you to fill. If there are already people who are members of this group, their names will appear in the list on the right. If you need to add a new person to
The People File, you can do so without leaving this screen by clicking the  Add button at the far right of the Person box.
Add a person to this group
Either:
- Double-click that person's name
OR
- Click the name to highlight it
- Then click the
right button
- That person's name will now appear in the list on the right.
OR
- You may select people from the list using the keyboard.
- Begin typing a person's last or first name.
- The list will scroll to highlight the closest match to the name you are typing.
- Continue typing until the correct name is highlighted or scroll and click to highlight the correct person.
- Press ENTER or click their name to add that person to the list.
Add every person to the group
- Click the Select All button and then click the
Remove one name from the group
- Click the name in the right column to highlight it, and then click the
left button.
Remove all group members
- Click the Remove All button at the bottom of the screen (i.e., to empty the list on the right)
 Additional information
If you wish to enter more details about a person's group Membership, use any or all of the following fields.
- Start / End Dates:
- You will be asked if you would like to enter a date range that would indicate the valid dates of Membership for these people in this group.
- If you enter a date range here, it will be entered on all of the records of the individuals you just added to this group in this session. (Use a MMDDYYYY date format WITHOUT slashes.)
- You are not required to enter dates here. Leave these fields blank if you do not wish to track this information.
- Entering an ending date for a person will terminate their enrollment in this group.
- Entering dates for people elected to a Church office or for Sunday School classes would both be a good use for this function.
- Role:
- Role is the person's level of enrollment in the group.
- Possible roles might be that of T — Teacher, C — Chair, or P — Participant.
- Click the Role box and click the down-arrow that appears.
- This is a List field; you create the codes (up to five characters or numbers) and descriptions to describe the role a person can have in a group.
- From the available roles, select the one that best describes each person's role in that Group or Class.
- Comments:
- You may also enter any Comments you wish.
- This is a character field and will accept up to 32 characters.
- You may track whatever information you choose.
- Transfer Date:
- Transfer Date records the date that person was moved into another Group or Class. (Use a MMDDYYYY date format WITHOUT slashes.)
- This is particularly useful for
Sunday School classes.
Note:
The Transfer Date is NOT the date the class was ADVANCED a level when you Advance Groups / Classes.
- Transfer Reason:
- Transfer Reason records the reason a member was transferred into another group.
- This is a
List field and you create the codes (up to 5 characters or numbers or a combination of the two) for the list of reasons for transferring people into other Groups or Classes.
For example, you might have as a reason for transfer: New Class Created. This would mean that your Sunday School classes have grown so large that you created a new class and moved some of the children into the new class.
Continue in this manner until you have entered / removed as many group members as you wish. Click Save to save your changes. Click Close to exit this screen. You may select another Group / Class and continue to add members, or you may go to the Skills tab and add people to those classifications. You are also now ready to begin Attendance Entry for your Groups/Classes.
