Add Groups / Classes
In
Church Windows, you can add new items to the list of Groups / Classes from the Setup Groups / Classes dialog box. You may wish to
Set Up Groups and Classes in a hierarchical structure made up of up to four component levels.
Church Windows defaults to the following structure:
Divisions, Departments, and Categories, then Groups / Classes. (These fields may also be renamed, see
Membership Settings.) You do not, however, have to have a hierarchical structure to your Groups and Classes.
To Add Groups / Classes
- From The Initial Portal of Church Windows choose Membership.
- Click Groups / Skills in the Button Bar at the top of the screen
- Choose Groups.

- Select the Division into which you want to add a Group or Class.
- Click + Add Groups / Classes
- The Settings panel on the right side of the screen will go blank to allow you to enter the information for your new group:
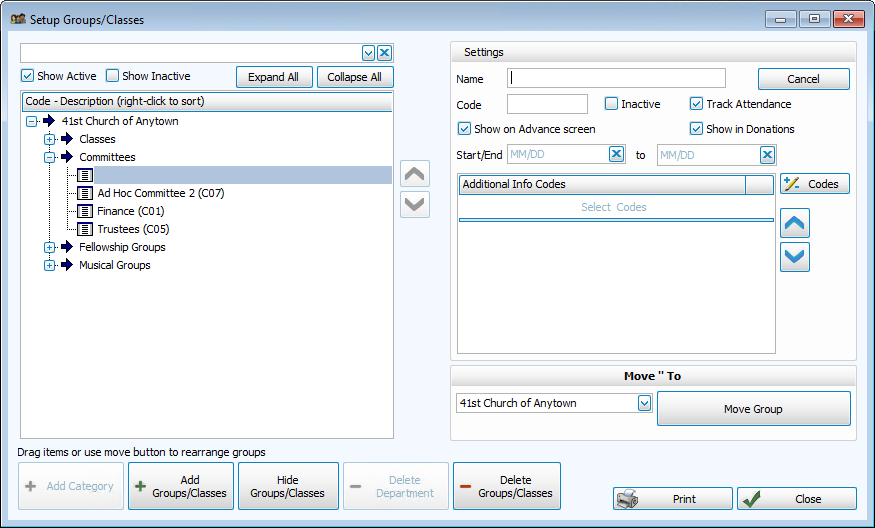
- Enter the name of the group in the Name box.
- In the Code box, type in the code you would like to assign to this Group or Class.
- Use the checkboxes to specify if the group should be included in Attendance Entry, Advance Groups / Classes, and Donations.
- If the Group or Class will be advancing and you wish to maintain historical records of past group enrollment, it is recommended that you enter Start/End dates. If you do not enter dates the system will display a message recommending that you do so:
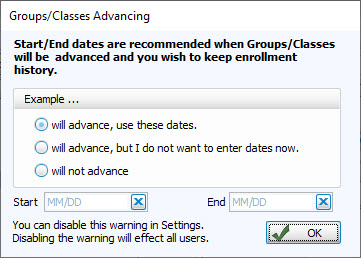
You can hide this warning (or to turn it back on if it has already been disabled) in Membership Settings. - Enter any additional tracking information, as needed:
 Tracking additional attendance information
Select the first class for which you wish to track additional Attendance Entry information. If you are looking for a particular Group / Class, enter the name of that Group / Class in the box at the top of the screen.
Track Attendance
The system defaults to a
 checkmark; leave the checkmark there if you plan to do
Attendance Entry
for this Group / Class. Remove the checkmark if you do not plan to track attendance for this Group / Class.
checkmark; leave the checkmark there if you plan to do
Attendance Entry
for this Group / Class. Remove the checkmark if you do not plan to track attendance for this Group / Class. Show on Advance Screen
The system defaults to a
checkmark; if the members in this class will be advancing to a predetermined new class, leave the checkmark in. You will tell the system which class these class members advance to on the
Advance Groups / Classes screen.Do not show in Donations
To hide this Group / Class from the Donations Module, click the box. Remove the checkmark if you plan to track donations for this Group / Class.
Additional Information
If you are tracking attendance for the Group / Class, you can also track additional information. You can track whatever you like: perhaps you will want to track if the group members brought their Bibles to the class, participated well, or brought a friend.
Identify information to track- Click the down-arrow on the first Additional Information box. The Additional Information dialog box will open.
- Click Add Items.
- Enter a one-digit code and a description for the item you wish to track.
For example, "B" for "Brought Bible."
- Click Add to add it to the list.
- You may continue adding other items that will be tracked in Groups or Classes.
- When finished, click Close, to close the Add Items box. Click Close again to close the Additional Information dialog box
- To select the codes to track, click the
 dropdown button in an Additional Information box.
 - The Additional Information dialog box opens, showing the codes and descriptions that you created.
Note:
The items in any list can be sorted either by the code or the description; the default is code for most fields. When viewing the list of codes and their descriptions, click on the header of the column by which you would like to sort the list (either the code or description) and a small, upward arrow will appear. This will automatically order your list by that column in ascending order. However, click once more and you will see that the column has reordered the list in descending order, with the arrow pointing downwards
  .
The items will revert to being sorted by code when you navigate elsewhere in Church Windows.
.
The items will revert to being sorted by code when you navigate elsewhere in Church Windows. - Select the item you wish to track:
- Click to highlight it
- Then click Add Item to Record
- Or you may double-click on the item
- Click Close to close the Additional Information dialog box.
Note:
You are able to track six different additional items about each Group / Class. These codes and descriptions will be available in the six Additional Information boxes for that class. Enter as many as you wish to track, putting one code in each Additional Information box. - If you wish to enter more Groups or Classes and their codes to this Department / Category, continue in the same manner.
- Continue setting up the remaining new classes within all the other Divisions, Departments and Categories.
- When you have finished adding, click Close.
Editing or Deleting Groups / Classes after they have been entered is a simple process as well. Once you have added your Groups / Classes, there are two ways to assign people in your database to these Groups and Classes:
Managing Group Members using Assign Groups & Skills OR
Managing Groups / Classes from Individual Record.
