Transaction Browser Options
The Transaction Browser Options screen is designed to help you filter the kind of transactions to either display on the Browse Transactions screen, or print on a Transaction Journal.
Access Transaction Browser Options
![]()
To access from the Button Bar, go to Transactions > Browse > Change Year, Filter & Sort
or
To access from the Transaction Journal Report, go to Reports/Export > Transaction > Transaction Journal
Filter
![]()
The filter tab allows you to set criteria for the transactions you'd like to see. Click the  to clear an individual field or
 ![]() to reset the filter tab.
to reset the filter tab.
Financial Year
This field lists current and prior accounting years with indicators for whether Beginning Balances have been finalized and whether it has been closed under Manage Years.
Account
Search or scroll to a specific account. Click  to include Accounts Payable and Receivable.
Fund
Selecting a fund will only show accounts that have been linked to that fund.
User
This allows you to search for transactions entered by a particular user.
Check/Ref #
This allows you to find a transaction by check or reference number.
Show Reconciled / Unreconciled
Use these checkboxes to filter transactions based on whether they've been cleared in a Bank Reconciliation.
Show Paid / Unpaid
Use these checkboxes to filter the status of a BILL (Expense). If you want to view all unpaid bills, check Unpaid and only bills under Transaction Type.
Show Reversed
Reversed transactions are hidden by default but can be view by checking Show Reversed. Once that is checked, you may also want to Show Only Reversed.
Date Occurred
Date Occurred is the original date of the transaction.
Date Posted
Date Posted is the date the entry was posted to Accounting.
Transaction #
This field searches for the program-assigned numbers associated with each transaction.
Amount #
This field searches for the total amount of a transaction.
Transaction Types
These filters allow you to include or exclude certain types of transactions.
Custom Account Groups Tab
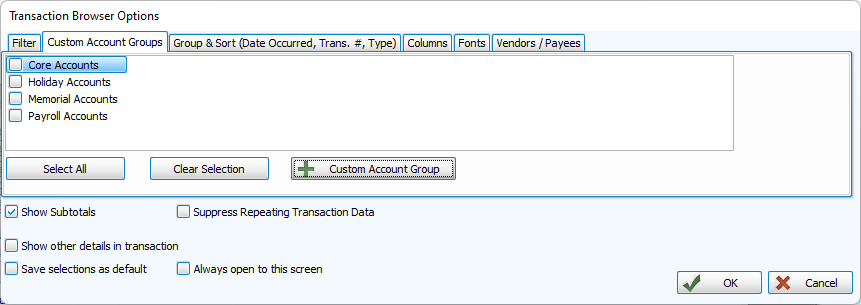
You can customize the report to show only the accounts and/or funds associated with specific Custom Account Groups.
-
Choose any or all desired Custom Account Groups, you can select whatever desired custom accounts groups individually.
-
Click Select All to place a check next to all options.
-
Click Clear All to remove all check marks.
-
Click + Custom Account Group to create a new set of accounts.
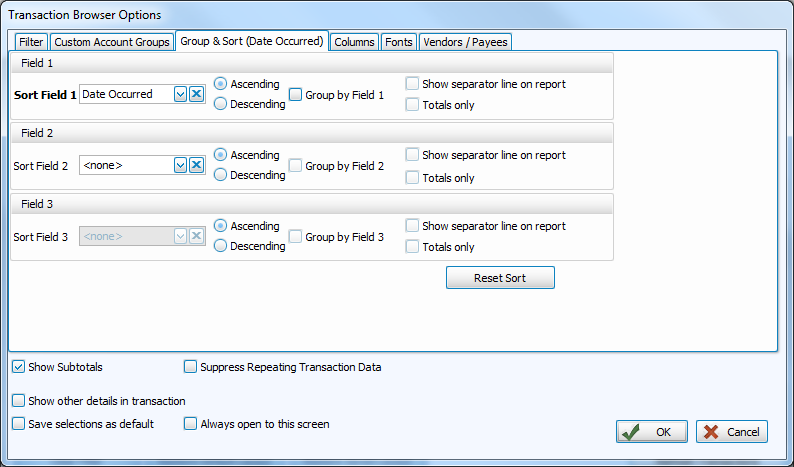
Group & Sort Tab
Use the Group & Sort tab to sort and group the list of transactions by up to three columns (sort fields). Click to change the order of each sort field to either Ascending or Descending order:
-
Place a check mark next to Group by Field to group data under a heading of the chosen sort fiel.d
-
If you will be printing a Transaction Journal, the following options are available:
-
Show separator line on report - For each sort field you have chosen to group, a horizontal line will separate the contents of the report.
-
Totals only shows only the totals of the sort field you have chosen to group by.
Click Reset Sort to return selections to their default state.
-
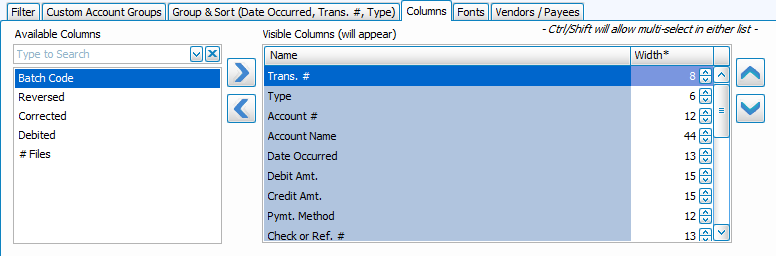
Columns Tab
-
Move columns you want to include to the right, and columns you want to exclude to the left.
-
Use the
 and
and  or double click to move a column to the opposite side.
 -
To select multiple columns at once
-
Click + CTRL - Selects multiple lines in any order
-
Click + SHIFT - Selects a range of lines in row
-
-
Use the
 and
and  to change the order of the columns from left to right.
 -
Determine the width of a column by character count. Change or abbreviate how a column is titled by editing Report Column Header.
-
Columns that appear in bold are Detail Report Columns and include additional information indented under a subheading.
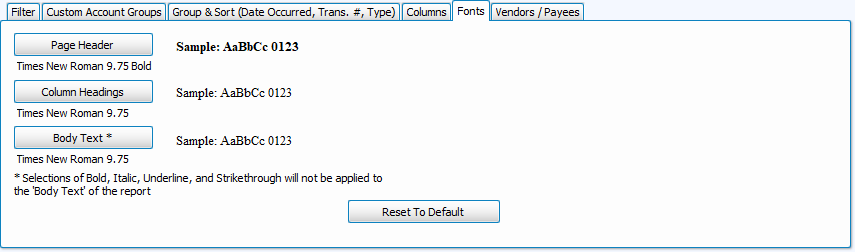
Fonts Tab
-
The Fonts tab is where you can control the typography of your report.
-
Click
 to restore the default 9.75 Times New Roman.
Vendors/Payees Tab
If you want your list to contain only transactions that affect certain vendors/payees, select from from the Available Vendors/Payees box and they will appear in the Include only listed Vendors/Payees list. Click an option you wish to remove and click Remove Selected as needed, or click Clear All Selections to clear the list.
Additional Options
There are some additional options that can be checked at the bottom of the Transaction Browser Options screen. Some will only apply to a Transaction Journal, while others are related to the display grid in Browse Transactions
-
Show Subtotals (Transaction Journal)
Shows a subtotal line after every set of credit and debit amounts associated with the transaction.
-
Suppress Repeating Transaction Data (Transaction Journal)
Shows one instance of information per transaction on the Transaction Journal that would otherwise be repeated on each line item per transaction.
-
Show Other Details In Transaction
On the Transaction Journal, marking this option shows a line for each detail that affects the transaction. Each line will show in italicized font the account number, the account name, the amount, and whether it was a debit (DR) or a credit (CR). If choosing this on the Transaction Browser Options screen, pressing the OK button will show an Add button next to each transaction number in the Browse Transactions list. Click the plus button to expand the transaction details.
-
Save Selections as Default
Checking this box and pressing the Print or OK buttons will automatically make the same selections the next time you enter this screen.
-
Always Open this Screen (Browse Transactions)
The Transaction Browser Options screen will open along with Browse Transactions.
The resulting transactions list shown will reflect the accumulation of all the selections made on the Filter, Custom Accounts, and Chart of Accounts tabs. Items selected on the Group & Sort and Columns tabs affect the structure and layout of the list. If you are printing a Transaction Journal, the Fonts tab selections will determine the typeface used on the report.