Transactions
Enter the money transactions affecting the Chart of Accounts of your Church by using the Transactions menu option. Then, choose the feature pertinent to the type of transaction you are posting:
![]()
Functions include Browse Transactions, Enter Income, Enter Bills, Pay Bills, Transfer, Accounts Receivable, Transfer Donations to Accounting, Enter Spoiled Check Numbers (Voided Checks), Adjust Asset Account, Payroll Journal Entry, and Journal Entry Transactions.
While entering batches of any of these types of transactions, if you try to close the window before posting or saving, you be presented with the following options:
![]()
You can "Post and Exit", "Save" to keep your progress to finish later, "Delete" to discard the entries, or "Cancel" to continue working.
Use the Browse button to lookup posted transactions on the Browse Transactions screen and make any necessary reversals or corrections.
Additional features include the application of Recurring Transactions and the display of a Running Balances window to guide you while posting transactions:
 Recurring Transactions
You can set up Recurring Transactions to post Accounting transactions that occur more than once throughout the year. Use Recurring Transactions to store information about the transaction that repeats. Such information includes any or all of the following: Payment Method, Asset Account, Income / Expense / Liabilities Accounts, Amount, and Comments. Each Recurring Transaction is kept track of by a Description and the Frequency that you enter for it, based on how often you plan to apply it as a transaction to post.
- To use a Recurring Transaction you must first access one of the following screens. Click the article listed for details:
- Once the screen appears, click the
 button in the top-right corner. The Recurring Transactions screen will appear:
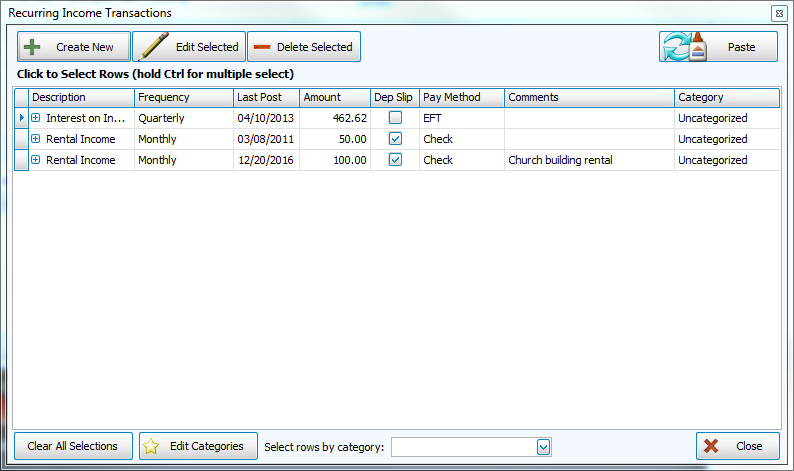
Choose one of the following options:- Select one or more existing Recurring Transactions and click the Paste button in the top-right corner to apply them to transactions you wish to post.
- Select an existing Recurring Transaction and click the Edit Selected button. Change the information you wish to make different, and click Save Transaction.
- Click the + Create New button to set up a new Recurring Transaction. Enter the information you want to have automatically entered for you when you apply the Recurring transaction in the future and click Save Transaction.
- If you wish to delete any Recurring Transactions, click the line you wish to remove and click the — Delete Selected button. The deletion of the Recurring transaction will not delete any transactions that have already been posted.
You can also assign categories to your Recurring Transactions by using the features found when clicking the Edit Categories button. You can also Select rows by category using the box at the bottom of the screen, according to assigned categories. Click Clear All Selections to start over with making selections.
Recurring Transaction Categories
When setting up Recurring Transactions you have the option to organize them into categories. Doing so enables you to select all Recurring Transactions that belong to the selected category and apply them to the transactions you are posting.
- Begin by clicking Edit Categories button at the bottom of the Recurring Transactions screen.
- When the Recurring Transaction Categories appears, type in a Description for your category and click Add.
- If you need to remove an existing category, click to select it from the list and click the Delete button.
- When finished click OK.
These categories will now be available for all existing and future Recurring Transactions.
Running Balances
On the screens that the button for it is available, click Show Running Balance to show you the current balance of the account, how the transactions at hand affect it, and the foreseen balance if the transaction were to be processed. These running balances are calculated as transactions are being added to a batch on one the screens where the Show Running Balance button is available.
