Introduction to Bank Reconciliation
In Church Windows Accounting, a church's checking account consists of different transactions. The are primarily donations coming into the church and checks and electronic payments going out of the checking account. The bank also records the church's checking account when it processes the checks, deposits, service charges, and other items. Each month the bank will make a detailed statement of the activity available to the church. Soon after the end of the month, it is advisable to complete a bank reconciliation. This compares what is recorded on the bank's books with what is recorded on the church's books.
Note: If you have just started using the Church Windows Accounting module, you may have deposits in transit or outstanding checks from your prior system. To enter that information, go to Special Functions >Prior System Checks.
Benefits of Regular Bank Reconciliation
Accuracy Assurance: Monthly bank reconciliations ensure your financial records are precise, which is crucial for transparent and accountable financial management.
Error Detection: Detect and rectify errors or discrepancies early, preventing financial complications.
Cost Savings: Avoid bank fees from overdrafts and bounced checks, saving valuable resources.
Donation Tracking: Ensure all donations and contributions are accurately recorded, helping non-profits maximize their financial support.
Compliance: Meet legal and regulatory requirements, safeguarding your non-profit's status.
Budget Control: Improve cash flow management for better planning and allocation of funds.
Transparency: Demonstrating responsible financial practices builds trust with donors and supporters.
Prevent Fraud: Early detection of unauthorized transactions protects your non-profit from potential fraud.
Simplify Reporting: Streamline year-end financial reporting and tax preparation.
Informed Decision-Making: Make strategic financial decisions with confidence based on accurate financial information.
Bank Reconciliation Process
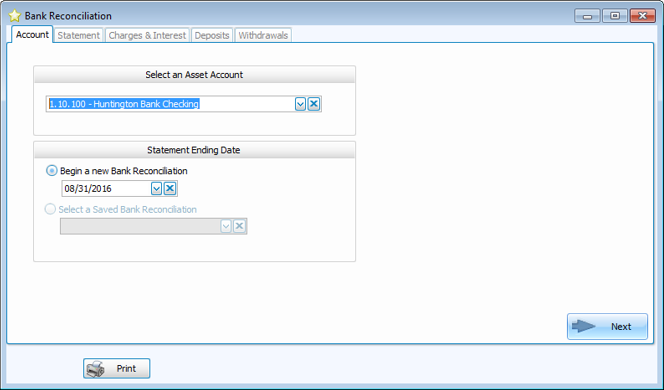
1. Starting the Bank Reconciliation
-
Go to Special Functions > Bank Rec.
-
Choose the bank account from the dropdown menu.
-
Enter the ending bank statement date.
-
Click Next.
-
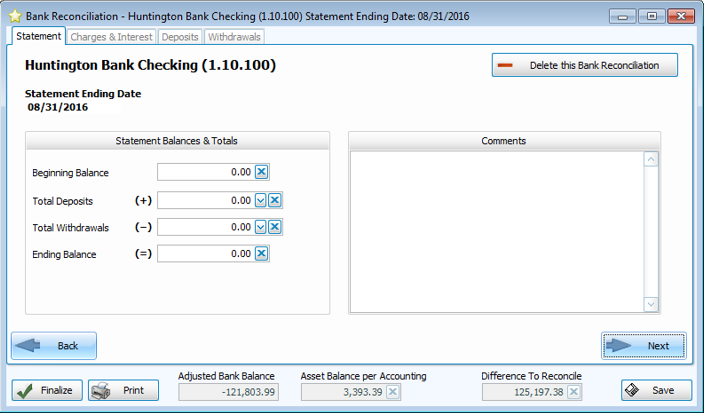
Enter the statement balances and totals from your bank statement.
Note: The beginning balance, plus the deposits, minus the withdrawals must equal the ending balance.
2. Record any unposted interest income or bank fees.
The next step in the bank reconciliation process is to post any as yet unposted income or expenses. Often you will see these for the first time on a bank statement, so this step is the best place to post these transactions. Keep in mind that these only need to be posted on this screen once, so if you save the bank reconciliation and later come back to it, these transactions do not need to be posted again.
3. Compare postings in bank account with items reported on the bank statement.
Deposits:
-
Match the deposits on the bank statement to the books - you can sort or group deposits by payment method and date - mark those deposits cleared.
-
Interest income: if this is listed on the bank statement but not on the bank reconciliation screen, you can use the charges and interest screen to enter it.
-
If any deposits are incorrect or not listed, you need to post them or go to Transactions > Browse to correct amounts.
Withdrawals:
-
Match withdrawals on the bank statement with the books - you can sort or group checks by Pay Method and Payment Type - mark those withdrawals cleared.
-
Service fees: If there are any fees, they will need to be posted as transactions if they aren't yet. Bank service charges are deducted from the bank statement. Other bank service charges include overdraws, and processing fees to stop payment orders to a check.
-
If any withdarawls are incorrect or not listed, you need to post them or go to Transactions > Browse to correct amounts.
Bank Errors
Bank errors are rare but do occur. Notify the bank of these errors. Depending on the circumstance, the correction could increase or dcrease the balance shown on the bank statement. Since the church did not make the error, the church's records will not be changed. You may want to make a notation in the comments section and you should reconcile the following month.
4. Adjusted bank balance
After posting any interest and bank services charges from the screen within the bank reconciliation, hopefully the difference to reconcile is zero. If the difference is not zero, then it's time to track down any difference.
-
At the bottom of the Deposit tab is a field that shows the total amount of deposits you cleared. This figure should match the figure entered into the deposit field on the Statement tab. If it does not, there is an issue with the deposits.
-
At the bottom of the Withdrawal tab is a field that shows the total amount of withdrawals you cleared. This should match the figure entered in the Withdrawal field on the Statement tab. If it does not, then there is an issue with the withdrawals.
Narrowing the difference to reconcile to either deposits or withdrawals is helpful. It often is also helpful to let a little time pass if you can't find the difference and pick it up at a later time.
Trouble Shooting Tips
Sometimes something as simple as counting items or checking your totals can lead you to what's causing your reconciliation problems. Here are some tips:
-
Count the number of checks and withdrawals on your bank statement. Compare that with the number of transactions in the Reconcile window. Do the same for deposits. Check to see if you:
-
Missed recording a transaction in Church Windows.
-
Missed marking an item as cleared.
-
Mistakenly marked an item as cleared.
-
Entered a transaction twice.
-
Entered a deposit as a payment or a payment as a deposit.
-
-
Check the dollar amount of the checks, withdrawals, or deposits.