Deposit Slip
The Deposit Slip report pulls up information about the check and cash donations that have been on a specific day, which are to be deposited into a specific bank account (or other asset).
Access Deposit Slip
To access from the Button Bar, go to Reports/Export > Transaction > Deposit Slip
![]()
Note: Before beginning, completer the Links to Accounting procedure for all the transactions you want to include in the Deposit Slip.
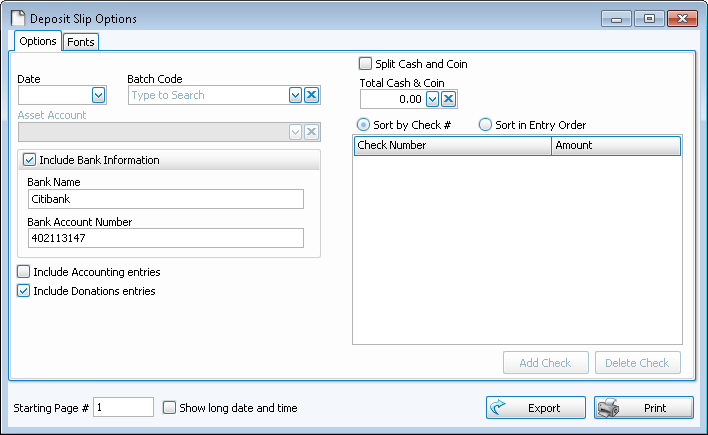
- By default, the
Deposit Slip Options screen is set to show you both
Donations and
Accounting entries:
- Place a checkmark in the Include Accounting entries box to display items that were entered in Accounting.
- Place a checkmark in the Include Donations entries box to display items that were entered in
Donations.
- Date —
Choose the day that the donations were given. - Batch Code —
If you would like information that pertains to only a specific batch of donations on the selected date, choose that batch from the box. - Asset Account —
If you have chosen to include Accounting entries, be sure to select the account to which you will be depositing your donations. - The Check Number and the Amount of the donations made by check for the selected date and Asset Account will appear in the list on the right side of the screen. Any bank information stored under the selected Asset Account in Accounting will also appear.
- Include Bank Information —
Place a checkmark in this box to print the bank information on the report. - Total Cash & Coin —
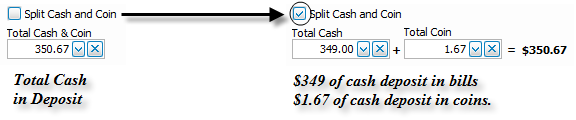
The total of the donations made in cash will appear at the top of the screen in the box.- If you need to separate the amount of cash given in bills and the amount of cash given in coins, click the Split Cash and Coin.
- The one box separates into two boxes for you to enter the Total Cash and Total Coin.
- As you enter the total cash and total coin, the amounts will be compared against a total of both items:
- Under the Cash & Coin options, a list of checks will show any donations made with a check.
- Choose between Sort by Check # and Sort in Entry Order to change the order in which the checks appear.
- Clicking the Sort by Check # option will place the items in the list in order according to the check number.
- If you click Sort in Entry Order, the list will reorder the items and place them according to when they were entered into Donations or Accounting.
- Click the Add Check button to add any check items that you will be making with this deposit and want to show on the Deposit Slip.
- To remove any items, click the desired item and click Delete Check.
Note:
The cash and check items and amounts displayed on the Deposit Slip Options screen ONLY affect the appearance of the report. No changes will be made to the donations as they were originally entered and stored in the software. Therefore, when you close the screen, any cash or check information you have added, changed, or removed will not be saved. - Click the Fonts Tab to make any changes to the style and/or size of the typeface printed on the report.
Once you have made all of your selections, click Print to view a Print Preview and then proceed in sending the file to your printer. You can also go to Exports for most reports and/or Send as Email as a file to be used outside of Church Windows.
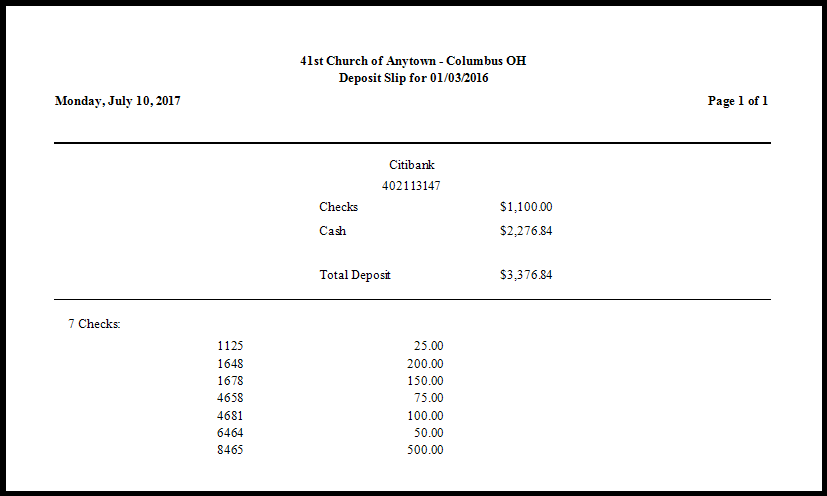
Example of a Deposit Slip