Labels
Through this work flow, you can generate address labels for mailings, contact information for a Rolodex, name tags, and more.
Access
To access from the Button Bar, go to Reports/Export > Lists & Labels > Labels

Step 1 - Select who should have labels Printed
In Step 1 - Select Who, you'll be setting up criteria to determine who has labels created.
-
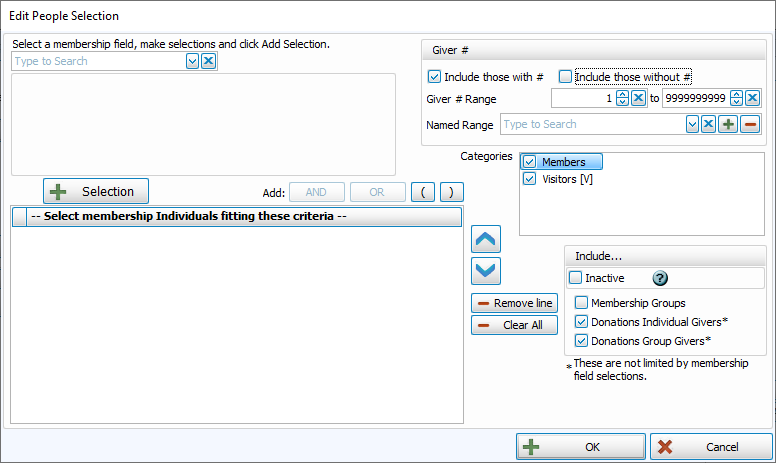
Edit People Selection Criteria - This screen allows you to use data entered into the People records in Membership to filter labels. You can also add criteria for Giver # or Envelope # assignments or range, include records that are from Donations or Inactive.
-
Add Giving/Pledging Selection Criteria - This area allows you to use data entered into the Donations module to determine labels. You might use this to filter people who have pledges, those with a particular amount of giving, or people who Give with Family.
-
Accounts Tab - Choose a particular campaign or set of giving accounts in order to select only those who have given or pledged to those accounts.
-
Sort Tab - Set the sort order for your labels here.
-
Use Giver # Current as of - If you are creating labels that include giver #s, use this date to choose what number assignments you want to include.
Step 2 - Select the Label Layout
Choose the Label Layout from the dropdown in the upper left. Click New to create a new layout.
One label per
On the next screen, you'll select your label layout from the drop down and whether you want
-
One label for each Individual
-
One label for each Giving Unit (those marked as Gives with Family)
-
One label for each Family (one label per household)
Names vs. Mailing Label
There are two templates available for the most common address label size, an Avery 5160.
-
[Template] Avery 5160 With Mailing Label
-
[Template] Avery 5160 With Name(s)
The Mailing Label option works well when you're addressing mail to a household. Examples of Mailing Labels might include Mr. & Mrs. Brown or The Jones Family. Choose the template with names works well when you're addressing an individual. If you select the name field and one label for family, each family member name will be included, separated by commas.
Label Options
Date of Mailing
The date of mailing is used to determine which address to use when someone has an alternate address. Review Manage Contact Information for more information about using alternate addresses and active dates.

Start Position
Adjusting the start position will move the position of the first label so that you can use a partial sheet of labels. The start position moves down and then across.
Postage $aver
Click the checkbox to use Postage $aver for Bulk Mailings.
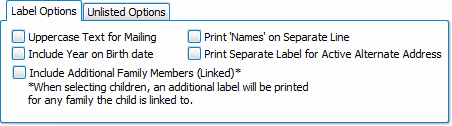
Label Options
-
Postal Addressing Standards outlined in Publication 28 by USPS recommend using uppercase for mailing labels.
-
If your labels include a date of birth, select whether to include the year.
-
When a child is linked to two households, you can opt to print a label for both addresses.
-
If you have both the Mailing Label and Names included on a label, you can choose to have first names printed on their own line.
-
Choose whether to print a separate label for an active alternative address.
Create Envelope # Labels
-
Open the label workflow by going to Reports/Export > Lists & Labels > Labels
-
In Step 1 - Select Who, click Edit People Selection Criteria.

-
In the upper right, in the Giver # section, deselect Include those without #. Click OK and then Next.
-
Click
 .
. -
Move or add Mailing Label and Current Address to the edge of the workable area to make room for the # field.
-
Click and drag Membership Field, listed under Data Controls, to the empty space on the label.
-
Choose Giver # (Envelope #) from the list of fields.
-
Save your layout.
-
Choose to produce One label per Giving Unit.
-
Click Print.