Events
Create a New Event
There are two ways to add a new event to Scheduler:
-
Click: To create an event of the default duration, double-click where you would like the event to appear.
OR
-
Drag: To create an event of a particular duration, drag out the desired area on the grid, then press Enter.
Note: You cannot add events if the Scheduler Main Screen display is set to View by Person. Click to change the display to another view (View by Date, View by Equipment, or View by Location).
Manage Events
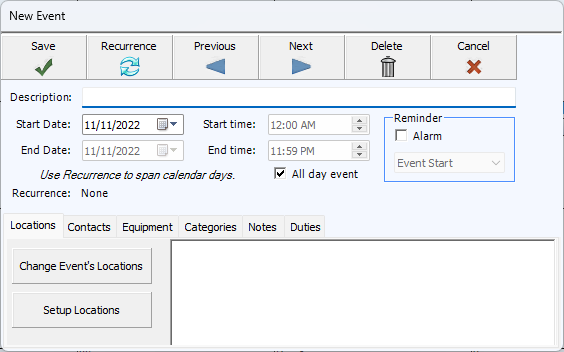
Add a New Event
Description
Enter a brief description of the event in the box. The information you type here will appear on the grid, as well as reports about this event.
Start Date
This will default to the date you clicked on in the grid, but you can change it. Just type in the date (use the MMDDYYYY date format without slashes), or click the calendar dropdown and select the date.
Start Time
This will represent the time you had selected on the grid, but you may change it if needed. You can use the arrow buttons to advance the hours, or just type in the time.
All day event
If the event lasts all day, check the All Day Event box. These events will appear on the grid in the gray space at the top.
Reminder Alarm
When you check this box it will provide you with a pop-up reminder. You can set the time for when you want the reminder to be displayed. Note: Reminder alarms can only display at the desired time if the Scheduler Module is running at the time of the alarm.
End Date and End Time
Enter if needed. The End Date will default to the same date as the Start Date. The End Time will default to the end time frame set on the Scheduler Options screen.
Edit or Delete an Event
To make modifications to an event, use the Scheduler Main Screen:
-
Click the event to open.
-
If the event is recurring, you will be prompted to select either Open entire series or Open this event only. If you choose to open this event only, you will not be able to Edit Recurring Events.
-
On the Event screen, all fields can be edited.
-
Make any desired modifications and click Save & Close.
Move an Event
If you need to change a scheduled event to a different date or time, go to the original date and time of the event on the Scheduler Main Screen, then either:
-
Drag and drop the event to the new time on the grid.
OR
Double-click the event.
-
Make the date and/or time change(s).
-
Click Save & Close.
The grid will reflect the new date or time.
Delete an Event
If you find that editing or deleting an event is not sufficient, there are three ways to delete an event. Either:
-
Open the event from the Scheduler Main Screen and click Delete on the Event screen.
OR
-
Right-click the event in the grid and select Delete from the menu.
OR
-
Select an event on the grid and press the Delete key on the keyboard.
If the event is recurring, you will be asked to Delete this event only or Delete the series.
Recurring Events
Add a Recurrence
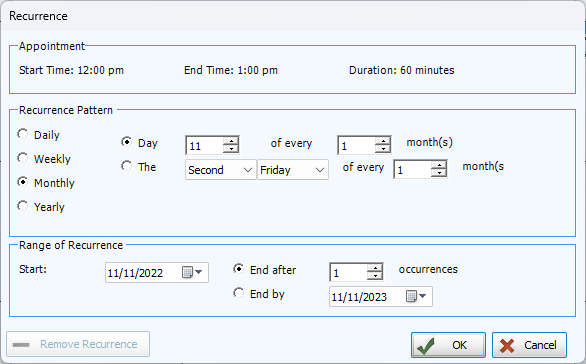
An event can be set to repeat when you are adding a new event, or later by editing or deleting an event.
-
Click the Recurrence button at the top of the screen.
Recurrence Pattern
Daily
Select whether the event will repeat every day, every weekday, or in an interval you specify (for example, every three days).
Weekly
Indicates that the event should repeat every week (or in an interval you specify, such as every two weeks and which day of the week the event should repeat.
Monthly
Choose between having the event repeat on a specific day of the month, or on a specific day of a specific week of the month (such as the first Tuesday), and how frequently (every month, every three months, etc.).
Yearly
Allows you to repeat the event once a year on a specific date, or on a specific day of a specific month.
-
Range of Recurrence
The Start date will represent when the even first occurs.
You can end the recurrence after a certain amount of time or on a particular End By date.
-
Click OK to save your new recurrence information or Cancel to discard the changes you have entered.
Edit Recurring Events
When you double-click an existing Recurring Event on the grid, a dialog box will appear telling you that the event is part of a series. The screen will then ask whether you want to open the entire series or only this event. Click the radio button next to your desired choice and click OK.
-
Open entire series: You can edit this date, all future events in this series, and the recurrence information.
-
Open this event only: Any changes you make to the event will only affect the selected date. The other events in the series will remain unchanged.
To make this event a one-time occurrence:
-
Click the Recurrence button at the top of the screen.
-
When the Recurrence screen opens up, click Remove Recurrence.
-
Click Save & Close to remove all dates from the series except the date being edited.
Other Event Features
Find Events
If you would like to find a particular event on the calendar, you can do so by clicking Find from the top menu and then Find Events. You can also press CTRL and F keys on your keyboard.
The Find Events window will appear:
-
Type the text you are looking for in the Search for Word(s) box.
-
Click Find, the relevant events will be listed in the Results box below.
-
If you would like to search in both the subject and notes field, select Include Notes.
-
Further refine your search by making selection in the Time Event Starts and/or Category dropdown boxes.
Conflicting Events
The Scheduler Module will warn you if you attempt to schedule an event that conflicts with another event’s Location, Equipment, and/or People.
You will be asked if you would like to resolve the conflict or save it anyway. If you choose to save, both events will show with a colored bar at the top to indicate the type of conflict.
To figure out what each color represents, click Conflict Colors at the top of the screen. This will open a legend showing what conflict each color indicates.
Change the conflicting colors:
-
Click Conflict Colors in the Button Bar at the top of the screen.
-
Click in the box of the conflict type you would like to change.
-
From the color palette, you can select a Basic Color or create a custom color.
-
You can click Restore Default Colors to change them back.
To print a list of the conflicts for a range of time, click Reports, then Conflict Report.
Export Events
After adding a new event, you can export it to vCal for use in other programs.
Scheduler > File > Export to vCal File
-
Enter the date range for the export dates in Start Date and End Date.
-
The Save As screen will open. The default file name will be [ChurchName] Scheduler . vcs. Select the folder you want to save the file to and click Save.
-
Follow the instructions in the other program to import the file, remembering that the file type is vCal or VCS.